Wednesday, June 1, 2011

Burning dual layer discs with ImgBurn

If you've ripped a DVD with AnyDVD then more than likely you'll need to burn a dual layer disc for a 1:1 backup. This is how to do just that using ImgBurn.

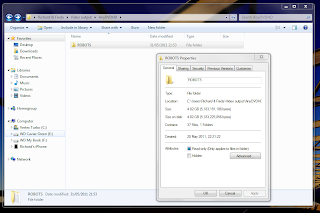
1. Check the file size of the AnyDVD output. Over 4.7GB and you'll need a dual layer disc.


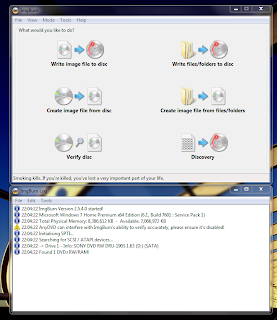
2. Fire up ImgBurn and choose 'Write files/folders to disc'


3. Choose the 'Browse for a folder' icon next to the large 'Source' window top left.


4. Find the AnyDVD output on your HDD. In this case it's the 'ROBOTS' folder we looked at in step 1. Click 'Select Folder' and you'll return to IMGBurn with your project listed in the large 'Source' window top left.


5. If you haven't set up 'AWS' then manually adjust the write speed. For video 4x is recommended.


6. Now select the large 'Build' icon bottom left and you'll be taken to the 'Confirm Volume Label' menu. Feel free to mess with the name of your DVD and when you're happy click 'Yes'.


7. Next you'll be taken to the 'Create Layer Break Position' menu. You'll only see this if ImgBurn thinks you need a dual layer disc ie the file is over 4.7GB Use the star icons to choose a layer break and preview the position if you wish. Select 'OK'.


8. ImgBurn will then throw a confirmation window at you. Check it over and click 'OK'. Burning will begin.

I've probably left loads out but so long as you use Adub's guide as your primary source of information then you should be good to go.

Tuesday, February 9, 2010

x264 HD content in an mkv container. How to watch via your PS3.

You could save yourself the aggravation and put the entire file into ConvertXtoDVD. Depending on settings you’ll end up with a DVD playable on any machine but the quality of the picture and sound will be nowhere near as good as the original. Far better to leave the content virtually intact and watch via your PS3. Unfortunately the PS3 does not recognise the mkv container format so you can’t just drop the file onto a USB HDD and plug it into the PS3. And even if you could do that the second obstacle would be the size of the file. They’re often huge (10GB+) and the PS3 only recognises drives formatted FAT32 which obviously limits you to 4GB. So what to do?

Change the container (remux) and split the file.

This is the approach to take if you want to play your content off a USB HDD or other removable media. Firstly download the excellent mkv2vob. A great tool and free. Install mkv2vob and go straight to the Configuration tab. Choose whichever file splitting option suits eg FAT32 (4GB). Then choose which transcoding codec you prefer. mkv2vob does not usually transcode video unless it has to but because you are splitting the file it will. Note that choosing x264 High Bitrate (Slow) can result in a collection of files many times larger than the original. Lastly choose whether you want mkv2vob to transcode any DTS soundtrack that the file may have. If you check this option DTS will be converted to AC3. Only leave unchecked if your AV equipment can output DTS. All other options can be left alone or on automatic.

Now go to the Add File tab. Browse to your source file and find a suitable destination. Note that it’s a good idea to keep your source and destination folders completely separate. It’s also recommended that neither folder is monitored by any sort of media player or server software. Use a ‘working’ folder somewhere else on your HDD. Then just click Add File and mkv2vob will change the container, split the file and transcode the video and audio as required. Depending on settings and the size of the source file this could take a while but you’ll end up with 4GB files than you can transfer onto a FAT32 formatted portable drive.

Change the container (remux) and stream the file.

Streaming the content allows you to either watch in real time or save to your PS3 HDD. You'll need to set up either a wired or wireless network. A wired Gigabit network is recommended though not required if you intend to watch video of an extremely high bitrate such as 1080p movies. You'll also need media server software such as TVersity or PS3 Media Server. Obviously the PS3s inability to recognise the mkv format still exists but the advantages of TVersity and PS3 Media Server are that they can both remux and transcode on the fly meaning they will change the container and the video or audio to suit as the file is sent to your PS3. They're pretty much a one stop shop but a high end PC and fast network are required if you want to stream in real time, get the best out of your content and avoid any stutter, freezing or image loss. Alternatively if you're running Windows 7 then Windows Media Player 12 will do a perfectly good job of just streaming. Windows 7s network, file sharing and streaming capabilities are a vast improvement over Vista and the process is quite simple. If your PC and network are not up to the job of changing the container, possibly transcoding and streaming all on the fly and you want to view content as it was originally encoded then that leaves us with mkv2vob and WMP.

Load your content into mkv2vob as previously described but under the Configuration tab set File Splitting to None, adjust DTS/AC3 accordingly and set Transcoding Codec at eg x264 (Slow). It's unlikely that mkv2vob will have to transcode but the setting is made just in case. Click Add File. Again this can take a while depending on settings, file size and your PC. The same advice applies regarding the location of your source and destination folders.

Once mkv2vob has completed move your file to your WMP monitored folder ie C:\Movies and after a few seconds it should show up in WMP. If you've set up your network correctly then your media server will be visible via your PS3 and you will be able to navigate to your folder or file. At this point you can do one of two things. If you have a suitable network you can just press Play on your PS3 and that's it or you can copy the file over your network to your PS3 HDD. Changing the container, altering the audio and any video transcoding required have all been taken care of by mkv2vob. It should be said that the copy option is also possible using TVersity and PS3 Media Server but it's a little unnecessary to run these applications when in this case the widely used WMP will do. Copying the file over to the PS3 HDD will also add a little extra functionality such as being able to easily fast forward, rewind and choose scenes.